- Email[email protected]
- Birthday20 August
- Phone(555) 555-1234
- LocationKingston, New York 12401

About Me
Lorem ipsum dolor sit amet, consectetur adipisicing elit. Eum in eos saepe ipsa cupiditate accusantium voluptatibus quidem nam, reprehenderit, et necessitatibus adipisci.
- Web Design Full stack
- 24/7 Support
- Unlimited Revisions
What I Am Doing
Web Design Full stack
Lorem ipsum, dolor sit amet consectetur adipisicing elit. Inventore dolorum atque dicta distinctio mollitia fuga.
Web Design
Lorem ipsum, dolor sit amet consectetur adipisicing elit. Inventore dolorum atque dicta distinctio mollitia fuga.
Education Quality
Personal Portfolio April Fools
University of DVI (1997 - 2001))The education should be very interactual. Ut tincidunt est ac dolor aliquam sodales. Phasellus sed mauris hendrerit, laoreet sem in, lobortis mauris hendrerit ante.
Examples Of Personal Portfolio
University of DVI (1997 - 2001))Contrary to popular belief. Ut tincidunt est ac dolor aliquam sodales. Phasellus sed mauris hendrerit, laoreet sem in, lobortis mauris hendrerit ante.
Tips For Personal Portfolio
University of DVI (1997 - 2001))Generate Lorem Ipsum which looks. Ut tincidunt est ac dolor aliquam sodales. Phasellus sed mauris hendrerit, laoreet sem in, lobortis mauris hendrerit ante.
Education Quality
Diploma in Web Development
BSE In CSE (2004 - 2008)Contrary to popular belief. Ut tincidunt est ac dolor aliquam sodales. Phasellus sed mauris hendrerit, laoreet sem in, lobortis mauris hendrerit ante.
The Personal Portfolio Mystery
Job at Rainbow-Themes (2008 - 2016)Generate Lorem Ipsum which looks. Ut tincidunt est ac dolor aliquam sodales. Phasellus sed mauris hendrerit, laoreet sem in, lobortis mauris hendrerit ante.
Tips For Personal Portfolio
University of DVI (1997 - 2001))Maecenas finibus nec sem ut imperdiet. Ut tincidunt est ac dolor aliquam sodales. Phasellus sed mauris hendrerit, laoreet sem in, lobortis mauris hendrerit ante.
Design Skill
PHOTOSHOT.
FIGMA
ADOBE XD.
ADOBE ILLUSTRATOR
DESIGN
Development Skill
PHOTOSHOT.
FIGMA
ADOBE XD.
ADOBE ILLUSTRATOR
DESIGN

All Web Development Projects
How to install cyber panel using command line
Installing CyberPanel
Step 1: Connect to your server via SSH
The installation of CyberPanel is quite simple. First, log into your server via SSH as the root user (sudo will not work). You can get the login details from your web host.
Step 2: Update packages
For Ubuntu: sudo apt update && sudo apt upgrade -y
For CentOS/Alma/Rocky:
sudo yum check-update
sudo yum update
Step 2: Run the installation script
Run the following command. It will initiate the automated installation script, which will prompt you for a few decisions about which version of LiteSpeed and which add-ons you would like to install.
sh <(curl https://cyberpanel.net/install.sh || wget -O - https://cyberpanel.net/install.sh)
If, for some reason, you are not able to log in as root, you can use this command
sudo su - -c "sh <(curl https://cyberpanel.net/install.sh || wget -O - https://cyberpanel.net/install.sh)"
Step 3: Select the version of LiteSpeed that you would like to use
Select which version of LiteSpeed to install. If you select LiteSpeed Enterprise, please ensure that you have obtained a license key first. It is free for 1 domain, but you still need to obtain the key. Visit the pricing table 346 to decide your desired plan.
CyberPanel Installer v2.1.2
RAM check : 184/981MB (18.76%)
Disk check : 7/30GB (27%) (Minimal 10GB free space)
- Install CyberPanel with OpenLiteSpeed.
- Install Cyberpanel with LiteSpeed Enterprise.
- Exit. Please enter the number[1-3]:
If you selected LiteSpeed Enterprise, you will see the following prompt. Enter your serial number
If you do not have any license, you can also use trial license (if server has not used trial license before), type TRIAL
Please input your serial number for LiteSpeed WebServer Enterprise:
Step 4: Select options and add-ons
You will be presented with a series of prompts for different options and add-ons that are available.
you just type Y every time.
Full Service (default Y):
Allow for your Database to be installed on a remote server
CyberPanel Version (default Latest Version):
You can choose to install a previous version of CyberPanel, or press Enter to install the latest
Password (default “1234567”):
It is recommended that you use “s” to set your own strong password
Memcached 22 (default Y):
Distributed memory object caching system
Redis 8 (default Y):
In-memory data structure store, used as a database, cache, and message broke
Watchdog 17 (default Yes):
Kernel watchdog is used to monitor if a system is running. It is supposed to automatically reboot hanged systems due to unrecoverable software errors
Step 5: Installation
The installation process will proceed automatically. It will take 5-10 minutes, depending on the speed of your server.
Step 6: Finalize Installation
At the end of the installation process, you will be presented with the following screen which contains important information about your configuation. Select and copy it to a safe location for future reference.
#
            CyberPanel Successfully Installed

            Current Disk usage : 7/30GB (26%)

            Current RAM  usage : 313/981MB (31.91%)

            Installation time  : 0 hrs 11 min 0 sec

            Visit: https://<your server's IP address>:8090
            Panel username: admin
            Panel password: <the password you set during installation>
            Visit: <your server's IP address>:7080
            WebAdmin console username: admin
            WebAdmin console password: TSXMwny4zVeDg37K

            Visit: https://<your server's IP address>:8090/rainloop/?admin
            Rainloop Admin username: admin
            Rainloop Admin password: gQKFWm9O3nr7Xn

         Run cyberpanel help to get FAQ info
         Run cyberpanel upgrade to upgrade it to latest version.
         Run cyberpanel utility to access some handy tools .

          Website : https://www.cyberpanel.net
          Forums  : https://forums.cyberpanel.net
          Wikipage: https://docs.cyberpanel.net
          Docs    : https://cyberpanel.net/docs/

        Enjoy your accelerated Internet by
            CyberPanel & OpenLiteSpeed
#
If your provider has a network-level firewall
Please make sure you have opened following port for both in/out:
TCP: 8090 for CyberPanel
TCP: 80, TCP: 443 and UDP: 443 for webserver
TCP: 21 and TCP: 40110-40210 for FTP
TCP: 25, TCP: 587, TCP: 465, TCP: 110, TCP: 143 and TCP: 993 for mail service
TCP: 53 and UDP: 53 for DNS service
Your provider seems blocked port 25 , E-mail sending may not work properly.
Step 7: Restart Server
Would you like to restart your server now? [y/N]:
Enter “y” to restart. Or enter “reboot” later after you have performed other desired operations.
Step 8: Access CyberPanel
After the successful installation you can access CyberPanel using the details below (make sure to change):
URL: https://:8090
Username: admin
Password:
Congratulations! you successfully install cyber panel on your server

How to connect s3 bucket to wordpress using wp offload media lite plugin
An Amazon S3 bucket is a public cloud storage resource available in (AWS). s3 a object storage offering. Amazon S3 buckets, which are similar to file folders, store media, which consists of data and its descriptive metadata.
Let’s started
Go to the AWS control panel and then the s3 bucket.
create an s3 bucket same as my screenshot.

Enter the bucket and click on the permission tab. then you have to off block all public access.

then we would have to add a bucket policy.
{
    "Version": "2008-10-17",
    "Statement": [
        {
            "Sid": "AllowPublicRead",
            "Effect": "Allow",
            "Principal": {
                "AWS": "*"
            },
            "Action": "s3:GetObject",
            "Resource": "arn:aws:s3:::arifwork/*"      //replace your bucket name
        }
    ]
}

then go to the IAM. we have to create a user. so click on the ‘User” and enter a user name.

then click on the attached existing policies directly then you will get create policy button. click on the create policy button


{
	"Version": "2012-10-17",
	"Statement": [
	{
		"Effect": "Allow",
		"Action": [
			"s3:CreateBucket",
			"s3:DeleteObject",
			"s3:Put*",
			"s3:Get*",
			"s3:List*"
		],
		"Resource": [
			"arn:aws:s3:::bucketname",
			"arn:aws:s3:::bucketname/*"     //replace your bucket name
		]
	}
	]
}


In the end, you have to add the plugin. the name of the plugin is “wp offload media lite” after active the plugin and enter the plugin settings. you will get a code like
define( 'AS3CF_SETTINGS', serialize( array(
	'provider' => 'aws',
	'access-key-id' => '********************',
	'secret-access-key' => '**************************************',
) ) );
you paste the code on your wp-config.php file. then paste the access key and secret id on the code.
How to Install Apache
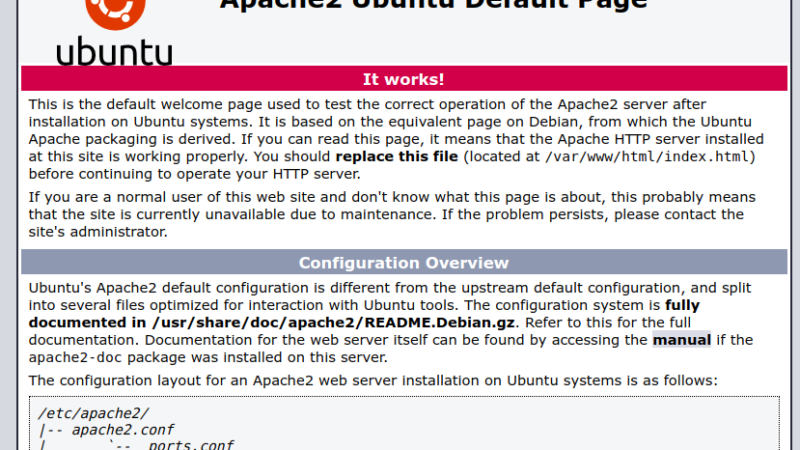
How to Install Apache
- Install Apache
sudo apt update && sudo apt upgrade -y
sudo apt install apache2 -y - Install PHP
cd /var/www/html - HTTPS
sudo apt install python3-certbot-apache -y
sudo certbot –apache -d -d www.domain
sudo certbot –apache -d huskyfurniture.com -d www.huskyfurniture.com

How to increase EC2 Instance root volume size
1st of all we need to format the partition
the command of formatting the partition is
$mkfs.ext4 /dev/xvdf
then we have to mount the partition to another directory for example we mount the partition on /opt directori. so now we have to cmnd
$mount /dev/xvdf /opt
So now our new volume is mounted on the /opt directory. But not visible. we can check it using the command
$df -h
Now we have to do visible this partition to the /opt directory
===================Another way====================
df -h
lsblk
growpart /dev/xvda1
lsblk -f
trdoxr2fs /dev/xvda1
Now check the size.
Common Firewall (UFW) command
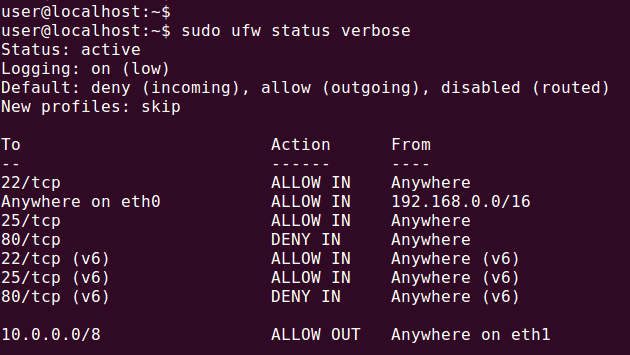
Common Firewall (UFW) command
$sudo ufw status
$sudo ufw enable
$sudo ufw disable
How to allow any port. just write ufw allow and the port and same way you can disallow any port look at the example given below.
$ufw allow 22
$ufw diallow 22
$ss -anpst
ufw delete allow 3389

How to install WordPress in ubuntu server
- Install Apache
sudo apt update && sudo apt upgrade -y
sudo apt install apache2 -y - Install PHP
sudo apt install php libapache2-mod-php php-mysql -y
MARIA DB Installation
MYSQL
sudo apt install mysql-server -y
sudo mysql_secure_installation
sudo apt install mariadb-server
sudo mysql_secure_installation
if show errors, when you install database. if sucessfully install then flow next section “database create”
solved it by running “$sudo mysql”
which logged me in as root without a password, then I ran
$ALTER USER ‘root’@’localhost’ IDENTIFIED WITH mysql_native_password by ‘mynewpassword’;
$ALTER USER ‘root’@’localhost’ IDENTIFIED WITH mysql_native_password by ‘4Hxla]h!@/8gjEWY’;
Database create
sudo mysql -u root -p
CREATE DATABASE wpdb DEFAULT CHARACTER SET utf8 COLLATE utf8_unicode_ci;
CREATE USER ‘wpuser’@’localhost’ IDENTIFIED BY ‘BNlerp4@38%4o^G7’;
mysql> CREATE DATABASE wpdb;
mysql> CREATE USER ‘wpuser’@’localhost’ IDENTIFIED BY ‘BNlerp4@38%4o^G7’;
mysql> GRANT ALL ON wpdb.* TO ‘wpuser’@’localhost’;
mysql> FLUSH PRIVILEGES;
mysql> EXIT;
Flow the command for a single website. For multi websites follow the next section command
cd /var/www/html
sudo wget http://wordpress.org/latest.tar.gz
sudo tar xzf latest.tar.gz
sudo mv wordpress/* .
sudo chown -R www-data: .
cp wp-config-sample.php wp-config.php
nano wp-config.php
sudo systemctl reload apache2
Follow the command for 2+ websites===Ignore this command, if you want to configure a single website.========================
No:1# WordPress
cd /var/www
sudo mkdir site1
cd site1
sudo wget http://wordpress.org/latest.tar.gz
sudo tar xzf latest.tar.gz
sudo mv wordpress/* .
sudo chown -R www-data: .
3.3 Apache configuration
cd /etc/apache2/sites-available/
sudo cp 000-default.conf site1.conf
nano site1.conf
ServerName netvnsite1.tk
ServerAlias www.netvn.site1.tk
DocumentRoot /var/www/site1
a2ensite site1.conf
a2dissite 000-default.conf
systemctl reload apache2
4.2 WordPress
cd /var/www
sudo mkdir site2
cd site2
sudo wget http://wordpress.org/latest.tar.gz
sudo tar xzf latest.tar.gz
sudo mv wordpress/* .
sudo chown -R www-data: .
4.3 Apache configuration
cd /etc/apache2/sites-available/
sudo cp 000-default.conf site2.conf
sudo nano site2.conf
ServerName netvnsite2.tk
ServerAlias www.netvnsite2.tk
DocumentRoot /var/www/site2
sudo a2ensite site2.conf
sudo systemctl reload apache2
- Port Forwarding
80,443
ufw allow 80
ufw allow 443
============================================ssl========================= - HTTPS
sudo apt install python3-certbot-apache -y
sudo certbot –apache -d -d www.domain
sudo certbot –apache -d huskyfurniture.com -d www.huskyfurniture.com
Congratulations! we prepare a complete web configuration

Nevine Acotanza
Chief Operating OfficerI am available for freelance work. Connect with me via and call in to my account.
Phone: +01234567890 Email: [email protected]


